WordPress – Ready to Go Checklist

So you’ve decided to start a blog. That’s great, I feel that blogging is one of the best ways to build “web authority” for search engines and improve your “web visibility”. I personally prefer an installation of WordPress installed under your own domain name, but what else should you do to make sure that your blog gets started on the right foot?

1. Make sure you link to your new blog from your main website. I like it best when you incorporate links to your blog in your main website navigation. If you can’t do that, create a button to go to your blog and position it prominently on every page or incorporate a link to your blog in your website footer.

2. Make sure you link your blog to your website. This is usually done in WordPress by creating a Blogroll. Typically I will include links to the main website, the contact page, and other important pages in the main website in the Blogroll. I do not typically link to outside sites in the WordPress blog roll. Additionally I like to position the Blogroll near the top of the column where it resides. Remember this is the navigation to your main website and you want to feed visitors there.

3. Make sure to enable your Blogroll and archive links on all pages of your blog. Don’t defeat this important navigation by installing this important feature on just the home page. All separate blog pages, archive, and tag pages should include these navigation elements.

4. Add items to your sidebars to make it easy for users to find what they need on your blog. Make sure to enable important features on all your blog pages such as archives, recent posts, recent comments, calendar of posts, and tagcloud. You can check out my own left and right blog sidebars to see what I personally consider important and where these items should be placed.

5. Use plug-ins to make your blog effective and easy to maintain. I always use the SEO All in One Pack plug-in. Additionally some of my favorites are: the Google sitemap creator, WordPress database backup, and Feedburner implementation. Additionally don’t forget to install Google Analytics or your web tracking script in your blog template.

If you follow my checklist above, and review all new plug-in configuration options you will be ready to go. Got a question, just click comments below and let me know and I’ll try to respond to each one.

Blogging for Dollars – Can You Make Money Blogging?

So you’ve heard that bloggers can make tons of money is that true? Well yes and no. Blogging is not right for every web savvy person and in fact not right for every good writer. So what makes a good blogger – one that can make some real money blogging?

1. Typically a blogger who is making a real living is not writing and making money from their own blog. They are making money being employed by a blogging firm that has a client base and they are providing contract writing services as a “for hire” service.

2. The best professional blogger is someone who knows how to budget their time and does not excessively word smith a post. It is impossible to make money blogging if each blog post you write for a client takes one to two hours and you are paid $10 to $15 for the post. If you have a natural writing style, innate grammar skills, and an interesting point of view you may be able to start out as a Junior Level blogger. The key to making money blogging is being able to write the volume needed on a consistent basis in under 20 to thirty minutes a post and then with a volume of five to ten posts a day.

3. Real money is paid to quality bloggers. One of our top bloggers makes from $2,200 to $3,000 a month just blogging. But not every blogger can start out at this level, and for that matter not every established blogger can perform at the level required to make this kind of money day in and day out. But, the best blog writers not only can make great money but can love the flexibility that the job provides. One of our bloggers only writes in the middle of the night. Another only writes on the weekend.

Identification of Trends Impacting Google Maps Placement

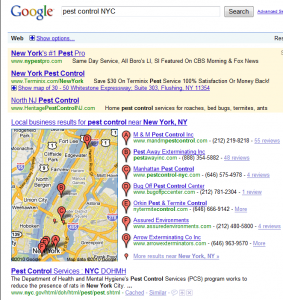
Image of a Google Maps exposure on Google.com.

I am starting to see a few trends in Google Maps that can be leveraged for placement and wanted to share them with you.

I have particularly studied several pest control firms up in the New York City and New Jersey areas. Here’s what I see in regards to who owns the top spot and on down. My comments below are based on what I see for the New York City search query above, but are matched with the New Jersey listings as well.

1. Typically the business with the most number of reviews will be placed first. These reviews are pulled from maps.google.com reviews as well as other review locations. The New York City reviews are being pulled from NewYork.CitySearch.com in the link above. All the business locations with the city name in the query with reviews are listed first and in order with the one with the most reviews listed in the number one position.

2. Google Maps then appears to pick up adjoining cities alphabetically with the business with the most reviews first. In the link above the first city was Astoria. The business listed had nine reviews.

3. Any businesses that had no reviews were then listed with the city that matched the search query first and then additional cities were listed in alphabetical order. So in this case the first listing without a review had a Manhattan address (as Google understands that this is New York City). The second business was in Astoria and also had no reviews. The next listing without a review was for Brooklyn.

Additionally Google will show a listing over another if it has a coupon. So if you have no reviews, but you offer one or two coupons, your listing will appear in a higher position than others without reviews and with no coupons.

It is easy to create coupons. You do so by logging into your Google Maps or Google Local Business Center account. Now getting positive reviews is harder.

My recommendation is that if Google Maps placement is valuable to your business is to get busy soliciting customer reviews. Provide clients with a link to post reviews directly on your Google Maps profile page when you have sold or completed your service. You may want to even encourage reviews with a small monetary tip, coffee cup with your name, or personal email asking for their comments and a link to your Google Maps page. I would also recommend that you create one to five coupons for your business.

This is the first real trend that I have been able to see in regards to how Google handles who gets placed where when it comes to Google Maps. At this time we do not offer Google Maps placement services as really getting reviews and creating coupons is about you and your interaction with customers directly and not necessarily something that should be farmed out. That being said, clearly the “nut has been cracked” so get busy working to improve your Google Maps placement starting with customer reviews and then coupons.

How to Add a Blog Post to WordPress

If you have never used WordPress sometime how to add a post is extremely confusing and especially if you want to publish on a future date. Here are the steps that we teach to our new blog writers on how to add a post.

Download and install IE Spell for your browser as many WordPress control panel spell checkers are not functional.

Visit www.IESpell.com. This little spell checker is then accessed from your tools menu. If you use Firefox, do a Google search and download a plug-in that you can use for spell checking.

Login to the blog control panel. You will be on the blog dashboard page once logged in.

Click Posts in the left side bar. The blog listing screen will open. If you have a draft post or pending post you will see it in the links on top of the blog post list.

To create a new blog post click Add New in the post menu in the left sidebar. The next screen will show the blog post entry control panel.

This is crucial – if you have created your blog post in Word or used one from the client, you MUST copy your post, paste it into Notepad, and then copy it from Notepad and then paste into the blog entry field. If you do not do this you will carry hidden font and character styles into the blog post which will be visible when published. You can typically access Notepad from the Accessories menu on your computer in your Microsoft Office products.

Once on the blog post control panel, type in or paste your blog title in the very top one line field. Paste in from Notepad or create your blog post in the larger box underneath the blog title.

To insert a link in your blog post, open another browser tab, go to the web page that you will want the link to direct to, copy the address from the address bar, must include the http:// in front of the link. Go back to the WordPress control panel and using your mouse drag to highlight the text you want to carry the hyperlink. I like to drag from the end of the phrase to the front to have better control over the link and so a space in not inadvertently picked up in the link. Then click the chain or hyperlink icon in the tool bar just above the post entry field. A small window will pop up, paste the link into the very first field overwriting the http:// that is already there, select in the drop down, open link page in a new window, and then click insert. WordPress will then underline and hyperlink your text in the blog post.

Make sure to spell check your blog post using IE Spell.

On the right side bar now create tags in the tag field that are keywords to find your blog post. I use all lower case for tags unless it is a proper name. I usually select one, two or three words based on the blog post.  Make sure to click Add.

Then look just below the tag field and select categories. Categories are like blog navigation so be judicious in adding them. All categories should be proper case.

In the top right box that says publish; look for Publish Immediately and EDIT. Do not click any other buttons at all like draft pending review or okay.

Click the Edit link to open the publish time calendar. If you are publishing ahead, change your date and time. I like to set the clock to 5:00 am as the publish time if I am scheduling a blog post ahead so it is there the first time someone looks. After setting the date and time, click PUBLISH. This is important to not click the okay button or preview button as your post may end up as a draft and not properly scheduled. After you have clicked publish you can go back to the blog post master page and click your blog post to preview it.

Always make sure you preview your blog before you log out to make sure you don’t have any funny characters and that your spacing is correct and images are in place.

To double check that all is well, click Posts on the left menu you will see your blog post in the link at the top that says scheduled and also in the blog post list with a countdown of hours until the publish time.